今天的主题是我一度谈之色变的。概念上讲,它是3D编程中最为困难的部分。
首先,你应该理解 3D 几何和笛卡尔坐标系他。你还应该理解由顶点构成的三角形组成的OpenGL虚拟世界的物体,各顶点定义了三维空间的特定点,你还应理解怎样使用这些信息在 iPhone上使用OpenGL ES进行绘制。如果你不理解这些概念,我建议你回头再看看我的前六篇文章。
为在交互式程序如游戏中使用这些虚拟世界中的物体,必须要有一种方法来改变物体间的相对位置以及物体与观察者之间的相对位置。要有一种方法不但可以移动,而且可以旋转和改变物体的大小。
还必须要有一种方法将虚拟的三维坐标转换成电脑屏幕的二维坐标。所有这些都是通过所谓变换来实现的。实现变换的内部机制是就是矩阵。
尽管你不需要懂得太多有关矩阵和矩阵的数学知识就可以实现许多OpenGL的功能,但对这些观念的基本理解有很大的帮助。
内建变换以及单元矩阵
你已经见识许多OpenGL的常用变换。其中有一个在每个程序中都可以见到,它就是 glLoadIdentity(),我们在 drawView: 方法的开始处调用它来进行状态复位。还见识过 glRotatef(),用来使二十面体旋转,另外还有 glTranslatef() 使物体在虚拟世界中移动。
我们首先看看glLoadIdentity()。此函数加载单元矩阵。我们将稍后讨论此特殊矩阵,但是加载单元矩阵本质上就是将虚拟世界进行复位。它清除了先前应用的任何变换。在绘制开始前调用 glLoadIdentity() 是一个很正常的习惯,因为你可以知道起点在什么地方 – 原点,从而可以预料变换的结果。
想知道如果你不调用glLoadIdentity()会产生什么结果,下载 第四部分的Xcode项目,在drawView:中为glLoadIdentity()调用加上注释,运行。发生了什么?
应该慢速旋转的二十面体急速地离开,对吗?像小飞鼠一样飞向天空离开视线。
发生这种现象的原因是在项目中我们使用了两个变换。二十面体的顶点是围绕原点定义的,所以我们使用转移变换将其移动三个单位远离观察者使整个物体可见。我们使用的第二个变换是旋转变换,它使多面体旋转。当使用了glLoadIdentity()时,每一帧开始时都是回到原点将多面体移离观察者三个单位,也就是说它每次都终止于同一位置z = -3.0。类似地,旋转值是随时间增长而增加的,使二十面体以均匀的步调旋转。由于前一个旋转值在开始旋转前被 glLoadIdentity()调用清除掉所以旋转是以匀速进行的。
不调用glLoadIdentity(),尽管第一次二十面体还是移离观察者三个单位并旋转一个小的角度。但从第二帧开始(几十毫秒后),二十面体将继续后移三个单位而且其旋转角度rot叠加已经旋转的角度。这将发生在每一帧上,这意味着二十面体每帧都会移离三个单位而且旋转的速度都会增加。
尽管我们可以不调用 glLoadIdentity()而对其结果进行补偿,但是由于我们许多时候无法预料转换的结果,所以最好的方法还是让转换开始于已知的位置(通常是原点)并且未经过旋转或尺寸变化,这就是我们总是先调用 glLoadIdentity()的原因了。
常见变换
除了glTranslatef()和 glRotatef()外,还有 glScalef(),它使绘制物体的尺寸增大或减小。在OpenGL ES中还有其他一些变换功能,但这三个(与glLoadIdentity()一起使用)是最常见的。其他功能主要用于将三维虚拟世界转换为二维表示的过程,这个过程称为透视 。我们稍后涉及一下透视,但大部分情况下,除了设置视口外我们不需要直接与透视打交道。
这些常用的变换非常实用。你可以仅使用这四个调用就完成整个游戏。但是有时你可能需要自己控制转换。你想要自己控制转换的一个原因是这些常用变换必须按顺序分别调用,每次调用都是一次具有一定开销的矩阵乘法(稍后讨论)。如果你自己进行转换,你可以将多个转换组合成一个矩阵,从而减少每帧都要进行的矩阵乘法操作。
由于你可以向量化你的矩阵乘法调用,所以你可以通过定义自己的矩阵来获取最大性能。据我所知,关于此点iPhone 并无文档记录,但作为基本规则OpenGL ES将对向量间或顶点和矩阵间的乘法进行硬件加速,但两个转换矩阵间的乘法并无加速。通过矩阵乘法向量化,你可以获得比让OpenGL进行矩阵乘法更好的性能。由于通常矩阵与矩阵的乘法调用的数量远小于向量/顶点间的矩阵乘法调用的数量,所以这并不会带来巨大的性能提升,但在一个复杂的3D程序中,每个方面小的额外性能提升都很有好处。
矩阵
这里我明显不是指电影“黑客帝国”(”The Matrix”),我们将要在随后的篇幅中介绍矩阵。
不幸的是没人可以告诉我矩阵是什么。
实际上,矩阵不过是一个二维数组。就这么简单。没什么神秘的。下面是一个矩阵示例:

这是一个 3×3 矩阵,它有三行和三列。顶点和向量实际由一个1×3的矩阵表示:

一个顶点还可以由一个 3×1 数组而不是一个 1×3 数组表示,但是我们这里使用1×3 格式(后面解释原因)。甚至一个数据元素技术上也可以用一个 1×1 矩阵表示,尽管这并不是一个十分有用的矩阵。
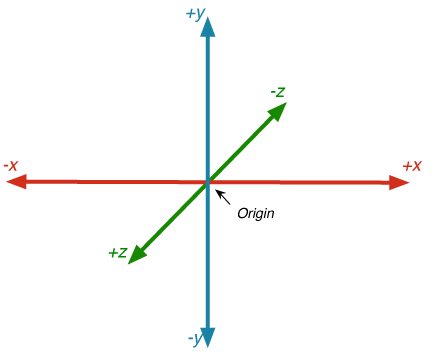
还有什么可以用数组来表示?坐标系统。还记得向量?向量是想象的从原点指向空间一点的直线。现在,记住笛卡尔坐标系统具有三个轴:
那么,指向X轴反向的归一向量是什么样的?记住:归一向量是长度为一的向量,所以一个沿X轴正向的归一向量是这样的:

注意我们是使用3×1 矩阵而不是像处理顶点一样使用1×3矩阵来表示向量。实际上这并不重要,只要按处理顶点相反的方式处理向量就行。向量中的三个数值适用于同一个坐标轴。我知道,这可能还不太好理解,但我很快就会解释到。Y轴向上的向量看上去像这样:

Z轴上的向量像这样:

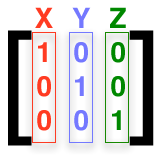
现在我们将这三个向量矩阵按照它们在顶点(x然后是y再后是z)中的顺序放入矩阵中,像这样:

有一个特殊矩阵称为单元矩阵。听起来很熟悉?当你调用glLoadIdentity()时, 你就加载了一个单元矩阵1。 这里我解释一下为什么它是一个特殊矩阵。矩阵可以通过相乘而组合在一起。如果你将矩阵乘以一个单元矩阵,其结果就是原始矩阵,就像数字乘以一。你可以通过将所有除行号和列号相等的元素外的值设置为0来设定一个任意尺寸的单元矩阵,行号和列号相等处的值为1.0.
矩阵相乘
矩阵相乘是矩阵组合的关键。如果你有一个定义了转移到矩阵和一个定义了旋转的矩阵,如果将它们相乘,你将得到一个既定义了旋转又定义了转移的矩阵。让我们看看一个简单的矩阵相乘的简单例子。看看下面两个矩阵的图像:

矩阵相乘的结果是另一个与等式左边矩阵一样尺寸的矩阵。矩阵乘法是不可置换的。顺序是很重要的。将矩阵a乘以矩阵b的结果不一定与矩阵b乘以矩阵a的结果相同(尽管在某些情况下有可能相同)。
有关矩阵相乘还有一件事需要注意:并不是所有的矩阵都可以相乘的。它们并不需要具有同样的尺寸,但等式中右边的矩阵的行数必须与等式中左边矩阵的列数相同。所以,你可以将一个3×3的矩阵与另一个3×3的矩阵相乘,或者你可以将一个1×3的矩阵与一个3×6的矩阵相乘,但你不能将一个2×4的矩阵与另一个2×4的矩阵相乘,因为2×4矩阵的列数与另一个2×4矩阵的行数并不相同。
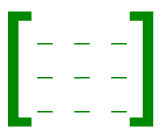
要得出矩阵相乘的结果,我们首先建立一个与等式中左边矩阵同样尺寸的空矩阵:
对矩阵中的各点,我们从左边矩阵中取出相应行,再从右边矩阵中取出相应列。所以,对于结果矩阵中的左上方的点,我们取出等式中左边矩阵的第一行以及等式中右边矩阵的第一列,像这样:

然后,将左边矩阵行中第一个值乘以右边矩阵列的第一个值,左边矩阵行第二个值乘以右边矩阵列的第二个值,左边矩阵行第三个值乘以右边矩阵列的第三个值,然后再将它们相加。像这样:

对结果矩阵中的各点重复以上步骤,得到以下结果:

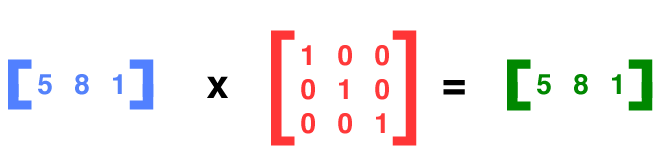
将矩阵(蓝色)乘以单元矩阵(红色),其结果就是原始矩阵。由于单元矩阵代表没有经过任何变换的坐标系统,所以结果完全合理。这也同样适用于顶点。我们将一个顶点乘以一个矩阵:
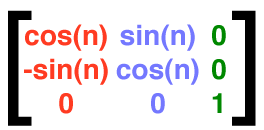
现在,我们假定我们希望旋转一个物体。我们要做的就是定义一个描述了被旋转的坐标系统的矩阵。在场景中,我们实际上是旋转了世界坐标,然后将物体绘制其上。如果说我们希望绕Z轴旋转一个物体,那么Z轴将保持不变,而X和Y轴将变化。尽管有些不那么直观,要定义一个绕z轴旋转的坐标系统,我们需要调整3×3矩阵中的x和y向量,换句话说,我们必须修改第一和第二列。
所以需要调整通过修改X轴向量的X值和Y向量的Y值为旋转角度的余弦值。余弦是三角形角度对应的相邻两边之比。我们还需要修改X轴向量的Y值为相同角度的正弦值的负值,以及Y轴向量的X值为相同角度的正弦值。用矩阵来表示可能更容易理解:

现在如果将世界坐标中所有物体的各顶点都乘以这个矩阵,那么物体将被旋转。一旦对物体的所有顶点都进行此操作,那么该物体将沿Z轴旋转n度。
如果你还不太理解也不要紧。其实你并不需要真正理解使用矩阵的数学原理。它们都是已经解决了的难题,你可以通过Google找到任何变换所需的矩阵。实际上,你可以在OpenGL的文档中找到大部分。所以如果你不能完全理解为什么这个矩阵导致绕Z轴的旋转,也完全不必气恼。
一个3×3的矩阵可以描述绕任意轴旋转任何角度的情况。然而,为表示可能遇到的任何变换,我们仍然需要第四行/列。第四列用来保存变换信息,第四行用来表示透视变换。因为需要理解同原坐标以及透视空间,而这些对于成为一个出色的OpenGL程序员并不重要,所以我不打算在这里介绍透视变换的数学原理了。要乘以一个4×4矩阵,我们需要填充一个附加值,通常我们称其为W。W应该为1。在进行乘法运算后,忽略W值。我不打算介绍向量的矩阵乘法,因为OpenGL已经对此进行了硬件加速,所以通常不需要进行手工处理,但理解其基本步骤是很好的建议。
OpenGL ES矩阵
OpenGL ES 中有两套矩阵,都是4×4的GLfloat矩阵。一个叫 modelview matrix ,你大部分时间都会与之打交道。它是你用来对虚拟世界进行变换的矩阵。要对虚拟世界中的物体进行旋转,转移或尺寸变化,你都需要对此矩阵进行修改。
另一个矩阵用来创建根据设定的视口对世界坐标进行描述的二维表示。此矩阵称为 projection matrix 。在绝大部分时间内,你都不需要接触该矩阵。
任何时刻这两个矩阵中只能有一个是活动的,任何与矩阵相关的调用,包括 glLoadIdentity(), glRotatef(), glTranslatef(), 和 glScalef() 只影响活动矩阵。当你调用 glLoadIdentity时,活动矩阵设置为单元矩阵。其他三个调用则创建一个转移/尺寸变换/旋转矩阵,并将该矩阵乘以活动矩阵,将活动矩阵的结果替换为矩阵乘法得到的结果。
在大部分情况下,你仅需在程序开始时将 modelview 矩阵设置为活动。实际上,如果你看过我的OpenGL ES 模板,你将在setupView: 方法中看到下面代码:
glMatrixMode(GL_MODELVIEW);
OpenGL ES的矩阵定义为一个由16 个GLfloat组成的数组,像这样:
GLfloat matrix[16];
它们也可以表示为一个二维C数组,像这样:
GLfloat matrix[4][4];
两种方法导致同样的内存被分配,所以完全是个人习惯问题,尽管前者更为普遍。
主题
好,我相信现在你已经有了足够的理论基础,想开始进行实践了。首先使用我的模板OpenEmpty%20OpenGL%20ES%20Application 创建一个项目,替换 drawView: 和 setupView:
- (void)drawView:(GLView*)view; { static GLfloat rot = 0.0; static GLfloat scale = 1.0; static GLfloat yPos = 0.0; static BOOL scaleIncreasing = YES; // This is the same result as using Vertex3D, just faster to type and // can be made const this way static const Vertex3D vertices[]= { {0, -0.525731, 0.850651}, // vertices[0] {0.850651, 0, 0.525731}, // vertices[1] {0.850651, 0, -0.525731}, // vertices[2] {-0.850651, 0, -0.525731}, // vertices[3] {-0.850651, 0, 0.525731}, // vertices[4] {-0.525731, 0.850651, 0}, // vertices[5] {0.525731, 0.850651, 0}, // vertices[6] {0.525731, -0.850651, 0}, // vertices[7] {-0.525731, -0.850651, 0}, // vertices[8] {0, -0.525731, -0.850651}, // vertices[9] {0, 0.525731, -0.850651}, // vertices[10] {0, 0.525731, 0.850651} // vertices[11] }; static const Color3D colors[] = { {1.0, 0.0, 0.0, 1.0}, {1.0, 0.5, 0.0, 1.0}, {1.0, 1.0, 0.0, 1.0}, {0.5, 1.0, 0.0, 1.0}, {0.0, 1.0, 0.0, 1.0}, {0.0, 1.0, 0.5, 1.0}, {0.0, 1.0, 1.0, 1.0}, {0.0, 0.5, 1.0, 1.0}, {0.0, 0.0, 1.0, 1.0}, {0.5, 0.0, 1.0, 1.0}, {1.0, 0.0, 1.0, 1.0}, {1.0, 0.0, 0.5, 1.0} }; static const GLubyte icosahedronFaces[] = { 1, 2, 6, 1, 7, 2, 3, 4, 5, 4, 3, 8, 6, 5, 11, 5, 6, 10, 9, 10, 2, 10, 9, 3, 7, 8, 9, 8, 7, 0, 11, 0, 1, 0, 11, 4, 6, 2, 10, 1, 6, 11, 3, 5, 10, 5, 4, 11, 2, 7, 9, 7, 1, 0, 3, 9, 8, 4, 8, 0, }; static const Vector3D normals[] = { {0.000000, -0.417775, 0.675974}, {0.675973, 0.000000, 0.417775}, {0.675973, -0.000000, -0.417775}, {-0.675973, 0.000000, -0.417775}, {-0.675973, -0.000000, 0.417775}, {-0.417775, 0.675974, 0.000000}, {0.417775, 0.675973, -0.000000}, {0.417775, -0.675974, 0.000000}, {-0.417775, -0.675974, 0.000000}, {0.000000, -0.417775, -0.675973}, {0.000000, 0.417775, -0.675974}, {0.000000, 0.417775, 0.675973}, }; glLoadIdentity(); glTranslatef(0.0f,yPos,-3); glRotatef(rot,1.0f,1.0f,1.0f); glScalef(scale, scale, scale); glClearColor(0.0, 0.0, 0.05, 1.0); glClear(GL_COLOR_BUFFER_BIT | GL_DEPTH_BUFFER_BIT); glEnableClientState(GL_VERTEX_ARRAY); glEnableClientState(GL_COLOR_ARRAY); glEnable(GL_COLOR_MATERIAL); glEnableClientState(GL_NORMAL_ARRAY); glVertexPointer(3, GL_FLOAT, 0, vertices); glColorPointer(4, GL_FLOAT, 0, colors); glNormalPointer(GL_FLOAT, 0, normals); glDrawElements(GL_TRIANGLES, 60, GL_UNSIGNED_BYTE, icosahedronFaces); glDisableClientState(GL_VERTEX_ARRAY); glDisableClientState(GL_COLOR_ARRAY); glDisableClientState(GL_NORMAL_ARRAY); glDisable(GL_COLOR_MATERIAL); static NSTimeInterval lastDrawTime; if (lastDrawTime) { NSTimeInterval timeSinceLastDraw = [NSDate timeIntervalSinceReferenceDate] - lastDrawTime; rot+=50 * timeSinceLastDraw; if (scaleIncreasing) { scale += timeSinceLastDraw; yPos += timeSinceLastDraw; if (scale > 2.0) scaleIncreasing = NO; } else { scale -= timeSinceLastDraw; yPos -= timeSinceLastDraw; if (scale < 1.0) scaleIncreasing = YES; } } lastDrawTime = [NSDate timeIntervalSinceReferenceDate]; } -(void)setupView:(GLView*)view { const GLfloat zNear = 0.01, zFar = 1000.0, fieldOfView = 45.0; GLfloat size; glEnable(GL_DEPTH_TEST); glMatrixMode(GL_PROJECTION); size = zNear * tanf(DEGREES_TO_RADIANS(fieldOfView) / 2.0); CGRect rect = view.bounds; glFrustumf(-size, size, -size / (rect.size.width / rect.size.height), size / (rect.size.width / rect.size.height), zNear, zFar); glViewport(0, 0, rect.size.width, rect.size.height); glMatrixMode(GL_MODELVIEW); // Enable lighting glEnable(GL_LIGHTING); // Turn the first light on glEnable(GL_LIGHT0); // Define the ambient component of the first light static const Color3D light0Ambient[] = {{0.3, 0.3, 0.3, 1.0}}; glLightfv(GL_LIGHT0, GL_AMBIENT, (const GLfloat *)light0Ambient); // Define the diffuse component of the first light static const Color3D light0Diffuse[] = {{0.4, 0.4, 0.4, 1.0}}; glLightfv(GL_LIGHT0, GL_DIFFUSE, (const GLfloat *)light0Diffuse); // Define the specular component of the first light static const Color3D light0Specular[] = {{0.7, 0.7, 0.7, 1.0}}; glLightfv(GL_LIGHT0, GL_SPECULAR, (const GLfloat *)light0Specular); // Define the position of the first light // const GLfloat light0Position[] = {10.0, 10.0, 10.0}; static const Vertex3D light0Position[] = {{10.0, 10.0, 10.0}}; glLightfv(GL_LIGHT0, GL_POSITION, (const GLfloat *)light0Position); // Calculate light vector so it points at the object static const Vertex3D objectPoint[] = {{0.0, 0.0, -3.0}}; const Vertex3D lightVector = Vector3DMakeWithStartAndEndPoints(light0Position[0], objectPoint[0]); glLightfv(GL_LIGHT0, GL_SPOT_DIRECTION, (GLfloat *)&lightVector); // Define a cutoff angle. This defines a 90° field of vision, since the cutoff // is number of degrees to each side of an imaginary line drawn from the light's // position along the vector supplied in GL_SPOT_DIRECTION above glLightf(GL_LIGHT0, GL_SPOT_CUTOFF, 25.0); glLoadIdentity(); glClearColor(0.0f, 0.0f, 0.0f, 1.0f); }
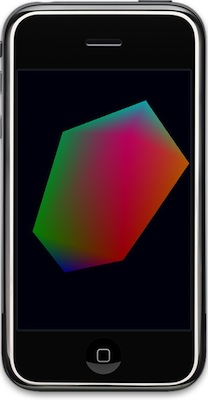
以上代码使用我们的老朋友 二十面体。与以前一样它旋转,但它同时还使用转移变换沿着Y轴上下移动,并且使用尺寸变换矩阵增加和减小尺寸。它使用了所有三个 modelview 变换;我们加载单元矩阵,使用OpenGL ES内部变换函数改变尺寸,旋转并且移动 。
让我们用自定义的矩阵替换内部函数。在进行修改前,先运行一下看看我们的程序到底应该是怎样工作的。
定义矩阵
我们自定义一个矩阵。
typedef GLfloat Matrix3D[16];
自定义单元矩阵
首先,我们自定义一个单元矩阵。像这样:

下面是代码:
static inline void Matrix3DSetIdentity(Matrix3D matrix) { matrix[0] = matrix[5] = matrix[10] = matrix[15] = 1.0; matrix[1] = matrix[2] = matrix[3] = matrix[4] = 0.0; matrix[6] = matrix[7] = matrix[8] = matrix[9] = 0.0; matrix[11] = matrix[12] = matrix[13] = matrix[14] = 0.0; }
第一印象这好像不太对。看上去我们传递的是Matrix3D的值。然而我们使用的是 typedef2 数组,由于C99数组与指针等价,数组是通过参考而不是值传递的,所以我们只是赋值给个数组中的值而不需要直接传递指针。
我使用了内嵌函数以消除函数调用的开销。但是这会有一定的副作用(主要是增加了代码的尺寸),本文中的代码与普通C函数一样。注意在C和Objective-C程序中, static 关键字是正确的(而且是很好的方法),但是如果你使用 C++ 或者 Objective-C++,那么你应该移除它。 GCC 手册 推荐在C内嵌函数中使用static,这是因为它允许编译器移除未被使用的内嵌函数所生成的汇编码。然而如果你使用 C++ 或者 Objective-C++,关键字 static 可能会影响链接器的行为而不会提供真正的好处。
好,现在我们使用新函数替代 glLoadIdentity()。删除 glLoadIdentity()然后使用下列代码进行替换:
static Matrix3D identityMatrix; Matrix3DSetIdentity(identityMatrix); glLoadMatrixf(identityMatrix);
我们定义了一个 Matrix3D,赋予其单元矩阵值,然后使用 glLoadMatrixf()加载此矩阵,这使用单元矩阵替代了活动矩阵(即本文情况下的 modelview 矩阵)。这与glLoadIdentity()调用完全一样。运行,你将看到与以前一样的结果。
现在,你明白了 glLoadIdentity() 是怎样工作的。继续。
矩阵乘法
在开始任何更多的变换前,我们需要编写一个两个矩阵相乘的函数。记住矩阵相乘是将两个矩阵合成一个矩阵的方法。我们需要编写一个通用矩阵相乘的方法,它允许任何尺寸的数组并且使用循环进行计算,但是我们最好不要使用循环。循环通常会带来一些开销。由于OpenGL ES中的矩阵总是为 4×4,最快的方法是分别进行计算。下面是矩阵乘法的代码:
static inline void Matrix3DMultiply(Matrix3D m1, Matrix3D m2, Matrix3D result) { result[0] = m1[0] * m2[0] + m1[4] * m2[1] + m1[8] * m2[2] + m1[12] * m2[3]; result[1] = m1[1] * m2[0] + m1[5] * m2[1] + m1[9] * m2[2] + m1[13] * m2[3]; result[2] = m1[2] * m2[0] + m1[6] * m2[1] + m1[10] * m2[2] + m1[14] * m2[3]; result[3] = m1[3] * m2[0] + m1[7] * m2[1] + m1[11] * m2[2] + m1[15] * m2[3]; result[4] = m1[0] * m2[4] + m1[4] * m2[5] + m1[8] * m2[6] + m1[12] * m2[7]; result[5] = m1[1] * m2[4] + m1[5] * m2[5] + m1[9] * m2[6] + m1[13] * m2[7]; result[6] = m1[2] * m2[4] + m1[6] * m2[5] + m1[10] * m2[6] + m1[14] * m2[7]; result[7] = m1[3] * m2[4] + m1[7] * m2[5] + m1[11] * m2[6] + m1[15] * m2[7]; result[8] = m1[0] * m2[8] + m1[4] * m2[9] + m1[8] * m2[10] + m1[12] * m2[11]; result[9] = m1[1] * m2[8] + m1[5] * m2[9] + m1[9] * m2[10] + m1[13] * m2[11]; result[10] = m1[2] * m2[8] + m1[6] * m2[9] + m1[10] * m2[10] + m1[14] * m2[11]; result[11] = m1[3] * m2[8] + m1[7] * m2[9] + m1[11] * m2[10] + m1[15] * m2[11]; result[12] = m1[0] * m2[12] + m1[4] * m2[13] + m1[8] * m2[14] + m1[12] * m2[15]; result[13] = m1[1] * m2[12] + m1[5] * m2[13] + m1[9] * m2[14] + m1[13] * m2[15]; result[14] = m1[2] * m2[12] + m1[6] * m2[13] + m1[10] * m2[14] + m1[14] * m2[15]; result[15] = m1[3] * m2[12] + m1[7] * m2[13] + m1[11] * m2[14] + m1[15] * m2[15]; }
此函数不分配任何内存,它只是将两个数组相乘的结果赋予结果数组。结果数组并非两个相乘数组中的任何一个,这是由于如果将结果赋予两个数组中的任意一个,在再次使用时会产生不正确的结果。
但是,等一下… 这实际不是更快一些吗,至少在iPhone上如此。iPhone具有4个向量处理器,它们使得进行浮点运算比使用iPhone CPU更快。然而使用向量处理器要求编写 ARM6 汇编码因为没有C函数库可以访问向量处理器。幸运的是已经有人找到通过使用向量处理器进行矩阵相乘的方法了。VFP 数学库 包含了许多向量运算功能而且它的许可证要求很宽容。所以我将在我们的代码中使用 VFP 数学库进行矩阵相乘,当运行在设备上向量版将被使用而在模拟器上则使用普通版(注意我已经包括了VFP数学库的许可证):
/* These define the vectorized version of the matrix multiply function and are based on the Matrix4Mul method from the vfp-math-library. This code has been modified, but is still subject to the original license terms and ownership as follow: VFP math library for the iPhone / iPod touch Copyright (c) 2007-2008 Wolfgang Engel and Matthias Grundmann http://code.google.com/p/vfpmathlibrary/ This software is provided 'as-is', without any express or implied warranty. In no event will the authors be held liable for any damages arising from the use of this software. Permission is granted to anyone to use this software for any purpose, including commercial applications, and to alter it and redistribute it freely, subject to the following restrictions: 1. The origin of this software must not be misrepresented; you must not claim that you wrote the original software. If you use this software in a product, an acknowledgment in the product documentation would be appreciated but is not required. 2. Altered source versions must be plainly marked as such, and must not be misrepresented as being the original software. 3. This notice may not be removed or altered from any source distribution. */ #if TARGET_OS_IPHONE && !TARGET_IPHONE_SIMULATOR #define VFP_CLOBBER_S0_S31 "s0", "s1", "s2", "s3", "s4", "s5", "s6", "s7", "s8", \ "s9", "s10", "s11", "s12", "s13", "s14", "s15", "s16", \ "s17", "s18", "s19", "s20", "s21", "s22", "s23", "s24", \ "s25", "s26", "s27", "s28", "s29", "s30", "s31" #define VFP_VECTOR_LENGTH(VEC_LENGTH) "fmrx r0, fpscr \n\t" \ "bic r0, r0, #0x00370000 \n\t" \ "orr r0, r0, #0x000" #VEC_LENGTH "0000 \n\t" \ "fmxr fpscr, r0 \n\t" #define VFP_VECTOR_LENGTH_ZERO "fmrx r0, fpscr \n\t" \ "bic r0, r0, #0x00370000 \n\t" \ "fmxr fpscr, r0 \n\t" #endif static inline void Matrix3DMultiply(Matrix3D m1, Matrix3D m2, Matrix3D result) { #if TARGET_OS_IPHONE && !TARGET_IPHONE_SIMULATOR __asm__ __volatile__ ( VFP_VECTOR_LENGTH(3) // Interleaving loads and adds/muls for faster calculation. // Let A:=src_ptr_1, B:=src_ptr_2, then // function computes A*B as (B^T * A^T)^T. // Load the whole matrix into memory. "fldmias %2, {s8-s23} \n\t" // Load first column to scalar bank. "fldmias %1!, {s0-s3} \n\t" // First column times matrix. "fmuls s24, s8, s0 \n\t" "fmacs s24, s12, s1 \n\t" // Load second column to scalar bank. "fldmias %1!, {s4-s7} \n\t" "fmacs s24, s16, s2 \n\t" "fmacs s24, s20, s3 \n\t" // Save first column. "fstmias %0!, {s24-s27} \n\t" // Second column times matrix. "fmuls s28, s8, s4 \n\t" "fmacs s28, s12, s5 \n\t" // Load third column to scalar bank. "fldmias %1!, {s0-s3} \n\t" "fmacs s28, s16, s6 \n\t" "fmacs s28, s20, s7 \n\t" // Save second column. "fstmias %0!, {s28-s31} \n\t" // Third column times matrix. "fmuls s24, s8, s0 \n\t" "fmacs s24, s12, s1 \n\t" // Load fourth column to scalar bank. "fldmias %1, {s4-s7} \n\t" "fmacs s24, s16, s2 \n\t" "fmacs s24, s20, s3 \n\t" // Save third column. "fstmias %0!, {s24-s27} \n\t" // Fourth column times matrix. "fmuls s28, s8, s4 \n\t" "fmacs s28, s12, s5 \n\t" "fmacs s28, s16, s6 \n\t" "fmacs s28, s20, s7 \n\t" // Save fourth column. "fstmias %0!, {s28-s31} \n\t" VFP_VECTOR_LENGTH_ZERO : "=r" (result), "=r" (m2) : "r" (m1), "0" (result), "1" (m2) : "r0", "cc", "memory", VFP_CLOBBER_S0_S31 ); #else result[0] = m1[0] * m2[0] + m1[4] * m2[1] + m1[8] * m2[2] + m1[12] * m2[3]; result[1] = m1[1] * m2[0] + m1[5] * m2[1] + m1[9] * m2[2] + m1[13] * m2[3]; result[2] = m1[2] * m2[0] + m1[6] * m2[1] + m1[10] * m2[2] + m1[14] * m2[3]; result[3] = m1[3] * m2[0] + m1[7] * m2[1] + m1[11] * m2[2] + m1[15] * m2[3]; result[4] = m1[0] * m2[4] + m1[4] * m2[5] + m1[8] * m2[6] + m1[12] * m2[7]; result[5] = m1[1] * m2[4] + m1[5] * m2[5] + m1[9] * m2[6] + m1[13] * m2[7]; result[6] = m1[2] * m2[4] + m1[6] * m2[5] + m1[10] * m2[6] + m1[14] * m2[7]; result[7] = m1[3] * m2[4] + m1[7] * m2[5] + m1[11] * m2[6] + m1[15] * m2[7]; result[8] = m1[0] * m2[8] + m1[4] * m2[9] + m1[8] * m2[10] + m1[12] * m2[11]; result[9] = m1[1] * m2[8] + m1[5] * m2[9] + m1[9] * m2[10] + m1[13] * m2[11]; result[10] = m1[2] * m2[8] + m1[6] * m2[9] + m1[10] * m2[10] + m1[14] * m2[11]; result[11] = m1[3] * m2[8] + m1[7] * m2[9] + m1[11] * m2[10] + m1[15] * m2[11]; result[12] = m1[0] * m2[12] + m1[4] * m2[13] + m1[8] * m2[14] + m1[12] * m2[15]; result[13] = m1[1] * m2[12] + m1[5] * m2[13] + m1[9] * m2[14] + m1[13] * m2[15]; result[14] = m1[2] * m2[12] + m1[6] * m2[13] + m1[10] * m2[14] + m1[14] * m2[15]; result[15] = m1[3] * m2[12] + m1[7] * m2[13] + m1[11] * m2[14] + m1[15] * m2[15]; #endif }
既然我们有将矩阵相乘的能力,我们就可以合并多个矩阵。由于我们的矩阵相乘的方法是硬件加速的,而OpenGL ES不支持矩阵与矩阵相乘的硬件加速,所以我们的方法应该比内嵌的变换方法要快一些3 。我们现在开始进行转移变换。
自定义转移
如果你还记得,我们使用4×4矩阵而不是使用3×3矩阵的一个原因是我们需要额外的一列用来保存转移信息。转移矩阵看上去像这样:

我们可以将其转换为函数:
static inline void Matrix3DSetTranslation(Matrix3D matrix, GLfloat xTranslate,
GLfloat yTranslate, GLfloat zTranslate)
{
matrix[0] = matrix[5] = matrix[10] = matrix[15] = 1.0;
matrix[1] = matrix[2] = matrix[3] = matrix[4] = 0.0;
matrix[6] = matrix[7] = matrix[8] = matrix[9] = 0.0;
matrix[11] = 0.0;
matrix[12] = xTranslate;
matrix[13] = yTranslate;
matrix[14] = zTranslate;
}
现在,我们怎样将其引入到 drawView: 方法中? 我们可以删除 glTranslatef(),替换为定义另一个矩阵并赋予适当的转移值,然后将其与当前矩阵相乘最后将结果加载到OpenGL的代码,对吗?
static Matrix3D identityMatrix;
Matrix3DSetIdentity(identityMatrix);
static Matrix3D translateMatrix;
Matrix3DSetTranslation(translateMatrix, 0.0, yPos, -3.0);
static Matrix3D resultMatrix;
Matrix3DMultiply(identityMatrix, translateMatrix, resultMatrix);
glLoadMatrixf(resultMatrix);
是的,这可以工作,但它做了一些不必要的工作。记住,如果你将矩阵与单元矩阵相乘,其结果一定是矩阵本身。所以当使用自定义矩阵时,如果要进行任何变换,我们不再需要首先加载单元矩阵。我们只需要创建变换矩阵并加载它:
static Matrix3D translateMatrix;
Matrix3DSetTranslation(translateMatrix, 0.0, yPos, -3.0);
glLoadMatrixf(translateMatrix);
由于不需要加载单元矩阵,此方法可以省去一些工作。另外,注意我将Matrix3D定义为static。我们不希望经常分配和解除内存分配。我们知道当程序运行时每一秒钟都需要用到此矩阵许多次,所以将其定义为static可以省去分配和解除内存分配的开销。
自定义尺寸变换
一个用于物体尺寸变换的矩阵像这样:

x, y, 或 z 为1.0表示在相应方向上尺寸无变化。3个值都为1.0代表单元矩阵。如果你赋值为2.0,则物在相应轴上尺寸加倍。我们可以将尺寸变换矩阵转化为OpenGL ES矩阵,像这样:
static inline void Matrix3DSetScaling(Matrix3D matrix, GLfloat xScale,
GLfloat yScale, GLfloat zScale)
{
matrix[1] = matrix[2] = matrix[3] = matrix[4] = 0.0;
matrix[6] = matrix[7] = matrix[8] = matrix[9] = 0.0;
matrix[11] = matrix[12] = matrix[13] = matrix[14] = 0.0;
matrix[0] = xScale;
matrix[5] = yScale;
matrix[10] = zScale;
matrix[15] = 1.0;
}
现在,因为我们需要使用超过一种变换,我们将使用矩阵乘法。要进行尺寸变换和旋转,我们需要将这两个矩阵相乘。删除先前代码中的 glScalef() 替换为下列代码:
static Matrix3D translateMatrix;
Matrix3DSetTranslation(translateMatrix, 0.0, yPos, -3.0);
static Matrix3D scaleMatrix;
Matrix3DSetScaling(scaleMatrix, scale, scale, scale);
static Matrix3D resultMatrix;
Matrix3DMultiply(translateMatrix, scaleMatrix, resultMatrix);
glLoadMatrixf(resultMatrix);
我们创建一个矩阵并赋予其适当的转移值。然后创建尺寸变换矩阵并赋值。然后将这两个矩阵相乘将结果加载到模型视口矩阵中。
自定义旋转
旋转稍微有点难度。我们可以创建绕各轴旋转的矩阵。我们已经知道绕Z轴旋转的矩阵像这样:
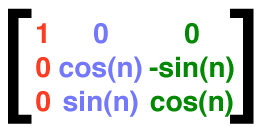
绕X轴像这样:
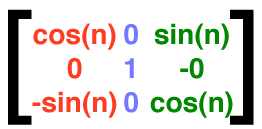
绕 Y轴旋转:
这三种旋转写成函数:
static inline void Matrix3DSetXRotationUsingRadians(Matrix3D matrix, GLfloat degrees) { matrix[0] = matrix[15] = 1.0; matrix[1] = matrix[2] = matrix[3] = matrix[4] = 0.0; matrix[7] = matrix[8] = 0.0; matrix[11] = matrix[12] = matrix[13] = matrix[14] = 0.0; matrix[5] = cosf(degrees); matrix[6] = -fastSinf(degrees); matrix[9] = -matrix[6]; matrix[10] = matrix[5]; } static inline void Matrix3DSetXRotationUsingDegrees(Matrix3D matrix, GLfloat degrees) { Matrix3DSetXRotationUsingRadians(matrix, degrees * M_PI / 180.0); } static inline void Matrix3DSetYRotationUsingRadians(Matrix3D matrix, GLfloat degrees) { matrix[0] = cosf(degrees); matrix[2] = fastSinf(degrees); matrix[8] = -matrix[2]; matrix[10] = matrix[0]; matrix[1] = matrix[3] = matrix[4] = matrix[6] = matrix[7] = 0.0; matrix[9] = matrix[11] = matrix[13] = matrix[12] = matrix[14] = 0.0; matrix[5] = matrix[15] = 1.0; } static inline void Matrix3DSetYRotationUsingDegrees(Matrix3D matrix, GLfloat degrees) { Matrix3DSetYRotationUsingRadians(matrix, degrees * M_PI / 180.0); } static inline void Matrix3DSetZRotationUsingRadians(Matrix3D matrix, GLfloat degrees) { matrix[0] = cosf(degrees); matrix[1] = fastSinf(degrees); matrix[4] = -matrix[1]; matrix[5] = matrix[0]; matrix[2] = matrix[3] = matrix[6] = matrix[7] = matrix[8] = 0.0; matrix[9] = matrix[11] = matrix[12] = matrix[13] = matrix[14] = 0.0; matrix[10] = matrix[15] = 1.0; } static inline void Matrix3DSetZRotationUsingDegrees(Matrix3D matrix, GLfloat degrees) { Matrix3DSetZRotationUsingRadians(matrix, degrees * M_PI / 180.0); }
对于各轴的旋转有两种方法,一种是使用弧度,另一种是使用角度。这三个矩阵被称为Eular angle 。有一个问题是我们必须按顺序对多个轴进行旋转,当我们对这三个角度进行旋转时,我们可能会遇到一种被称作gimbal lock(框架自锁)的现像,它导致其中一个轴的旋转被锁定。为防止这种现象的发生,我们必须创建一个可以处理多轴旋转的矩阵。除了可以消除自锁的问题,它还能在物体需要绕多轴旋转时节省处理器的开销。
说实在的,我并不打算假装理解了此方法后面的数学机制。我读过一篇有关此机制的博士论文(四元数的矩阵表示),但我无法完全理解所有的数学原理,所以我们就基于信任此多旋转矩阵可以正常工作(它确实如此)。此矩阵假定了一个指定的角度N以及一个由3个浮点数值表示的向量。此向量的各元素将被N乘,从而导致绕对应轴的旋转:

此矩阵要求向量是以单元向量(即法线)方式被传递的,所以我们在为矩阵赋值前必须保证这点。表示为OpenGL矩阵,像这样:
static inline void Matrix3DSetRotationByRadians(Matrix3D matrix, GLfloat angle, GLfloat x, GLfloat y, GLfloat z) { GLfloat mag = sqrtf((x*x) + (y*y) + (z*z)); if (mag == 0.0) { x = 1.0; y = 0.0; z = 0.0; } else if (mag != 1.0) { x /= mag; y /= mag; z /= mag; } GLfloat c = cosf(angle); GLfloat s = fastSinf(angle); matrix[3] = matrix[7] = matrix[11] = matrix[12] = matrix[13] = matrix[14] = 0.0; matrix[15] = 1.0; matrix[0] = (x*x)*(1-c) + c; matrix[1] = (y*x)*(1-c) + (z*s); matrix[2] = (x*z)*(1-c) - (y*s); matrix[4] = (x*y)*(1-c)-(z*s); matrix[5] = (y*y)*(1-c)+c; matrix[6] = (y*z)*(1-c)+(x*s); matrix[8] = (x*z)*(1-c)+(y*s); matrix[9] = (y*z)*(1-c)-(x*s); matrix[10] = (z*z)*(1-c)+c; } static inline void Matrix3DSetRotationByDegrees(Matrix3D matrix, GLfloat angle, GLfloat x, GLfloat y, GLfloat z) { Matrix3DSetRotationByRadians(matrix, angle * M_PI / 180.0, x, y, z); }
此多轴旋转的版本以glRotatef()一样地工作。
现在我们替换了3个内嵌函数,下面是使用自定义矩阵和变换函数的 drawView: 方法。新矩阵代码以粗体表示:
- (void)drawView:(GLView*)view; { static GLfloat rot = 0.0; static GLfloat scale = 1.0; static GLfloat yPos = 0.0; static BOOL scaleIncreasing = YES; // This is the same result as using Vertex3D, just faster to type and // can be made const this way static const Vertex3D vertices[]= { {0, -0.525731, 0.850651}, // vertices[0] {0.850651, 0, 0.525731}, // vertices[1] {0.850651, 0, -0.525731}, // vertices[2] {-0.850651, 0, -0.525731}, // vertices[3] {-0.850651, 0, 0.525731}, // vertices[4] {-0.525731, 0.850651, 0}, // vertices[5] {0.525731, 0.850651, 0}, // vertices[6] {0.525731, -0.850651, 0}, // vertices[7] {-0.525731, -0.850651, 0}, // vertices[8] {0, -0.525731, -0.850651}, // vertices[9] {0, 0.525731, -0.850651}, // vertices[10] {0, 0.525731, 0.850651} // vertices[11] }; static const Color3D colors[] = { {1.0, 0.0, 0.0, 1.0}, {1.0, 0.5, 0.0, 1.0}, {1.0, 1.0, 0.0, 1.0}, {0.5, 1.0, 0.0, 1.0}, {0.0, 1.0, 0.0, 1.0}, {0.0, 1.0, 0.5, 1.0}, {0.0, 1.0, 1.0, 1.0}, {0.0, 0.5, 1.0, 1.0}, {0.0, 0.0, 1.0, 1.0}, {0.5, 0.0, 1.0, 1.0}, {1.0, 0.0, 1.0, 1.0}, {1.0, 0.0, 0.5, 1.0} }; static const GLubyte icosahedronFaces[] = { 1, 2, 6, 1, 7, 2, 3, 4, 5, 4, 3, 8, 6, 5, 11, 5, 6, 10, 9, 10, 2, 10, 9, 3, 7, 8, 9, 8, 7, 0, 11, 0, 1, 0, 11, 4, 6, 2, 10, 1, 6, 11, 3, 5, 10, 5, 4, 11, 2, 7, 9, 7, 1, 0, 3, 9, 8, 4, 8, 0, }; static const Vector3D normals[] = { {0.000000, -0.417775, 0.675974}, {0.675973, 0.000000, 0.417775}, {0.675973, -0.000000, -0.417775}, {-0.675973, 0.000000, -0.417775}, {-0.675973, -0.000000, 0.417775}, {-0.417775, 0.675974, 0.000000}, {0.417775, 0.675973, -0.000000}, {0.417775, -0.675974, 0.000000}, {-0.417775, -0.675974, 0.000000}, {0.000000, -0.417775, -0.675973}, {0.000000, 0.417775, -0.675974}, {0.000000, 0.417775, 0.675973}, }; static Matrix3D translateMatrix; Matrix3DSetTranslation(translateMatrix, 0.0, yPos, -3.0); static Matrix3D scaleMatrix; Matrix3DSetScaling(scaleMatrix, scale, scale, scale); static Matrix3D tempMatrix; Matrix3DMultiply(translateMatrix, scaleMatrix, tempMatrix); static Matrix3D rotationMatrix; Matrix3DSetRotationByDegrees(rotationMatrix, rot, 1.0f, 1.0f, 1.0f); static Matrix3D finalMatrix; Matrix3DMultiply(tempMatrix, rotationMatrix, finalMatrix); glLoadMatrixf(finalMatrix); glClearColor(0.0, 0.0, 0.05, 1.0); glClear(GL_COLOR_BUFFER_BIT | GL_DEPTH_BUFFER_BIT); glEnableClientState(GL_VERTEX_ARRAY); glEnableClientState(GL_COLOR_ARRAY); glEnable(GL_COLOR_MATERIAL); glEnableClientState(GL_NORMAL_ARRAY); glVertexPointer(3, GL_FLOAT, 0, vertices); glColorPointer(4, GL_FLOAT, 0, colors); glNormalPointer(GL_FLOAT, 0, normals); glDrawElements(GL_TRIANGLES, 60, GL_UNSIGNED_BYTE, icosahedronFaces); glDisableClientState(GL_VERTEX_ARRAY); glDisableClientState(GL_COLOR_ARRAY); glDisableClientState(GL_NORMAL_ARRAY); glDisable(GL_COLOR_MATERIAL); static NSTimeInterval lastDrawTime; if (lastDrawTime) { NSTimeInterval timeSinceLastDraw = [NSDate timeIntervalSinceReferenceDate] - lastDrawTime; rot+=50 * timeSinceLastDraw; if (scaleIncreasing) { scale += timeSinceLastDraw; yPos += timeSinceLastDraw; if (scale > 2.0) scaleIncreasing = NO; } else { scale -= timeSinceLastDraw; yPos -= timeSinceLastDraw; if (scale < 1.0) scaleIncreasing = YES; } } lastDrawTime = [NSDate timeIntervalSinceReferenceDate]; }
诡异但很奇妙的自定义矩阵
到目前为止,我仅仅展示了怎样重建OpenGL存在的功能,我们所作的只是基于矩阵相乘是硬件加速的这一原理对性能进行了一番小小的提升,但在99%的情况下,还不足以让我们如此大费周章。
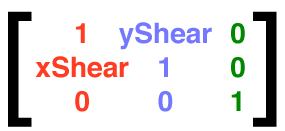
但是,手工处理矩阵变换还有其他好处。例如,你可以创建OpenGL ES本身不支持的变换。比如,你可以进行剪切变换。 剪切本质上就是将物体沿两轴扭转。如果你对一个塔的轴进行扭转,那么它就会成为比萨斜塔。下面是剪切矩阵:
下面是代码:
static inline void Matrix3DSetShear(Matrix3D matrix, GLfloat xShear, GLfloat yShear) { matrix[0] = matrix[5] = matrix[10] = matrix[15] = 1.0; matrix[1] = matrix[2] = matrix[3] = 0.0; matrix[6] = matrix[7] = matrix[8] = matrix[9] = 0.0; matrix[11] = matrix[12] = matrix[13] = matrix[14] = 0.0; matrix[1] = xShear; matrix[4] = yShear; }
如果我们应用剪切矩阵,我们将得到:
尝试一下用内嵌函数实现。你可以组合矩阵调用。例如,创建一个函数不需要任何矩阵乘法生成转移和尺寸变换。
结论
矩阵是一个很大而且经常让人误解的课题,许多人(包括我自己)都在殚精竭虑去理解它。希望本文能给你足够的帮助,而且还提供了一个矩阵相关的库,你可以用在自己的项目中。如果你希望下载自己尝试一下,请下载feePart6Projectl。我定义了两个常量,一个用来打开/关闭自定义变换,另一个用来打开/关闭剪切变换。它们在GLViewController.h 中:
#define USE_CUSTOM_MATRICES 1 #define USE_SHEAR_TRANSFORM 1
1为打开,0为关闭。另外我还更新了 OpenGL ES Xcode TemEmpty%20OpenGL%20ES%20Application 项目使其包括了新的矩阵函数,包括向量化矩阵乘法函数。如果你无法完全消化,你也无需担心。对于开发OpenGL ES程序的99%的人来说,你不需要完全理解透视空间,同质坐标或线性变换,只需大体上的了解即可。
感谢 Snappy Touch 的 Noel Llopis。
注脚
- 实际上,当你调用glLoadIdentity()时, 你加载了一个 4×4 的单元矩阵。
- 如果你希望使用 struct 而不是 typedef 时,你必须记住要以引用方式传递参数。struct并不会像数组一样自动以引用方式被传递。
- 使用Shark测试,drawView: 方法从.7% 的处理时间降低为 .1% 的处理时间。对于此方法而言,速度有本质的提高,但对程序总体而言,影响不大。
原文见:OpenGL ES From the Ground Up, Part 7: Transformations and Matrices
本文由 cswxzx 创作,采用 知识共享署名4.0 国际许可协议进行许可
本站文章除注明转载/出处外,均为本站原创或翻译,转载前请务必署名
最后编辑时间为: Jan 22, 2016 at 03:08 pm